
Strip-Down
Leadscrew and Self-Acting Mechanism
I started by removing the obvious bits - the lock nut at the very top. This was removed easily to reveal a spring, plus a stack of metal and plastic washers - I guess the latter are not original! These form a type of simple clutch, which appears to be the way that a degree of self-acting (i.e. moving the drill downwards as it turns) is achieved.
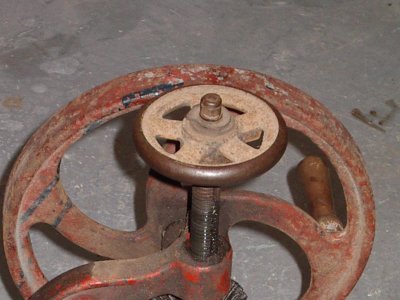


The way it seems to work is that the inner threaded shaft, (1) is free to spin inside the leadscrew, and has the chuck attached, being turned by the main handle. The washers are screwed onto this and press onto the top of the round handle (2). This is attached to the leadscrew which moves the whole lot up and down. Thus by adjusting the top nut, more or less friction can be applied, and the leadscrew will be turned (and hence pressed onto the work) with a greater or lesser force. Simple, though I don't know how effective yet.
I guess that the plastic washers are later replacements for what would be wearing parts - perhaps fibre washers? Either way, they're knackered, I will need to decide whether to replace with nylon, bronze, steel...the spring is also knackered (squashed flat) so will need replacing.
The leadscrew itself is then just screwed out of the top of the frame. It wasn't quite that easy though, as the end of the thread was a bit knackered where it has been pushing down onto the top of the shaft below. Old fashioned, soft metal. Some gental persuasion with a hammer and screwdriver was needed to bend the damaged thread back into shape, then it unscrewed easily.


Main Handle and Gear
Next was the main winding handle. Nice and straightforwards, this. Remove the grub screw holding the gear on:

Then gently lever the handle and shaft off - plus-gas helps! Once it starts, it could just be worked out by winding the handle back and forth while pulling. Machined to a very close tolerance.

Removed, it's clear that the grub screw hasn't always held the gear on the shaft very well - there's a lot of scoring:


I also wanted to remove the wooden handle as it has a crack in it, and is no longer very firm. The handle is mounted on a shaft which has a lip on the free end, the other end being pressed into the main wheel, and then rivetted over. It's very secure. So there's no way of removing the wooden handle without removing the shaft, and I certainly don't fancy trying that.
So I elected to grind away the lip at the free end, and slide the wooden handle off that way. You can see the lip in the picture below. It was easy enough to grind down with a small bit in the dremel.


The wooden piece looks restorable, so I'll glue it and give it a spruce up. Then I figure I'll cut a thread onto the shaft, and turn up an end cap which screws onto the end to hold the wooden handle in place.
Main Shaft
This just leaves the main shaft, which I made a bit of a meal out of.
Much like the other gear, this one has a screw in it - a round head, not a grub screw, but otherwise looks much the same. I conveniently didn't get a picture of it.
Anyway, this could be turned a tiny amount in either direction - wasn't jammed, but I could not unscrew it. What I should have done is look at other things, but I got fixated on it and eventually decided to drill it out. Having carefully done this, I found that I still couldn't remove the shaft - it wouldn't slide down through the gear. So I realised that something else as afoot.

Firstly, there is a pin driven through the shaft which holds two parts of it together. This was hidden in the general gunge and I hadn't seen it. This was easily knocked out with a hammer.

However, the shaft still wouldn't slide out. The very top of it, where the leadscrew presses down, had become splayed outwards, and so was getting wedged:


Gently tapping it back into shape with a hammer sorted that out, and finally, the whole lot could be slid down and out.

So what of the mystery screw I'd drilled out? I'd been careful, so the shell of it remained, and I was able to extract it once everything was apart. Turns out that the end of it is machined down to rectangle, so that it fits into the keyway on the main shaft (visible on the right hand end in the pic below). This is why I couldn't unscrew it...so it provides drive from the gear to the shaft while still allowing it to slide up and down. Obvious, now. But I've not seen a shaft keyed quite like this before. Simple enough though, so I'll be able to make a new one. The threads are BSW (Whitworth), which is what I'd expect from something of this vintage.

So the correct way to remove the shaft would have been to ignore the screw, remove the pin, tap the top of the shaft back into round, and it should all have just slid out.
The gear has a couple of chipped teeth, but nothing which should matter too much:

In Pieces
All that remained then was to slide the main frame from the stand, and it was all in bits. While doing this, I noticed that the clamp handle for the main frame has been sawn off at some point:


Can't imagine why, but maybe I'll turn up a knob of some sort to go on the end.
So here are all the bits, before and after degunging


The model name on the base:

I was in two minds as to whether to leave it as it was, or repaint it. There are two schools of thought here! In the end, I decided to repaint - keeping the old paint has a certain charm, but there's no sensible reason why. On a 10 or 20 year old tool you'd repaint, without a second's thought. And it had various dribbles of other coloured paint on it. So I stripped the old paint off, with stripper, then a wire brush to remove any stubborn bits.