Throw the Switch
15 August 2013
So we're approaching the time of "main engine start". The engine itself is ready to go, as far as I can tell, and assuming I haven't cocked anything up. So I should be able to plug the ecu in, callibrate a few bits, check the various subsystems, and go.
This time I wanted to avoid any problems. So I will go step-by-step. First step, connect the ecu just by its power, earth, and the fan relay switch to check that the previous fault is gone, then connect everything else apart from the coils and callibrate the Throttle sensor, IACV, and Crank position sensor. Then try to start it.
Step 1
Oh dear.
I wired up the ecu as before, turned on the ignition, all was well. Turned off the ignition...fan came on, again. This was...disheartening. I possibly even swore. A lot.
So, troubleshooting. Check the wiring, again. Couldn't see anything wrong, at all. Big sigh. OK, the wiring is quite hard to follow through the loom - maybe I'm missing something. So I made up the circuit which Emerald had sent to me, on a board, off the car, so I could be absolutely sure, using a bulb to stand in for the fan:
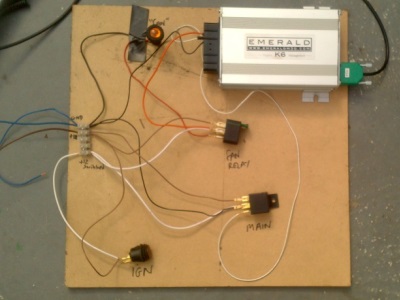
Yeah it still happened. Turn on, all is fine, turn off, everything stayed live, and the bulb came on. I changed the relays, played with the ecu software settings, tried everything I could think of, but to no avail. I thought that there must still be a fault inside the ecu, and current was leaking back out of the fan lead, and finding its way to earth back through the relays, keeping them open.
So I spoke to Emerald, again, and we exchanged a few emails. They quickly spotted the problem - apparently the driver inside the ECU naturally switches between earth and the power input - so the fan input is actually normally live, then switches to earth to activate the relay. This means that when I cut the power, the current does indeed earth back through the relays and hold them open. Fortunately, this is normal behaviour and not a fault, and all that is required is moving one wire to remove this path to earth.
I had been pretty down for a couple of days, but getting this sorted was a real boost to my morale.
Pre-start checks
The ECU needs a few things callibrating before start up. The throttle sensor is one, which is basically a case of showing the ecu where the open and closed positions are.
IACV seems to be a thing to do once the thing runs, and it's turned off by default. But I wanted to check the wiring - the IACV has 3 pins, one is +12v, the other two go to the ecu but there's nothing to say which is which. You just have to try it and see. I connected a piece of hose to the IACV inlet and checked if I could blow down it. Couldn't, so it must be closed. Then with the ecu on, and the pc connected, you can control it manually. I opened it, it buzzed but I still couldn't blow through it. So then I switched the wires, and this time, when it got to about 20% according to the ecu, it started letting air through.
Another unknown are the Crank and cam sensors. Each has 2 wires, and again there's no way of telling them apart. For the crank sensor, the ecu has an LED which should turn green when the engine is cranking and it's locked on to the signal - it will also show the RPM in the "live adjustments" screen on the PC.
This was the first time that the engine would be cranked over properly - though I left the coils disconnected at this stage. There's a lot to start watching out for now.
I cranked, briefly, and the ecu didn't register anything. So I switched the leads around, and lo and behold, the LED turned green, and the pc showed 140 rpm as it cranked. Hurrah!
My joy was quickly tempered by the smell of petrol - there was a small seep from a union at the filter on the battery shelf, leaving a small puddle right under all the wiring. Nice. Nothing major though, I hadn't tightened the union properly. I took the opportunity to check all of the fuel lines, but couldn't see any other leaks.
This had meant that I hadn't been watching to check for oil pressure (though I had checked previously, I'm a bit paranoid about it). So I cranked for a few seconds more, and the warning light went out. Not seeing much on the gauge yet though, but then I'm not sure if it will when cranking.
Since it was getting late, I elected to call it a night. In theory, all that's left is to connect the coils and go; the cam sensor might be the wrong way around but that's the last piece, and I can only find out by trying to start it.
Udpdate - IT LIVES
Started first time (as soon as I remembered I had to open the throttle - the idle control isn't set up yet).
Some oil leaks to deal with, but it works!
Run-in and Snagging
10 September 2013
Back from a week off and it feels like I'm in a real "race to the finish" now. It's like being in the last mile of a marathon, but that last mile is all uphill over rough ground.
I was on a high after it started, and quickly went around and fixed the oil leaks. A couple from the oil filter and oil filter take-off unions. These are fairly cheap push-on mocal ones rather than Aeroquip, and the difference is clear, both in terms of price and function.
They don't leak at the hose, but at the screw on compression joint. These have to be done up to "FT" levels to get a seal, I'm talking BIG spanners and really leaning on them. In all it took me a couple of rounds of tightening and testing to get them sealed properly, so I'm glad I spent the (lots) extra on Aeroquip fittings for the fuel system. Oil leaks are just annoying, fuel leaks are dangerous.
Then there was a small seep from one of the rocker covers to fix (the gasket doesn't cover the front part of the cover, so I'm using silicone sealant and I missed a bit - I suspect there is a special seal I'm missing, but sealant will do fine here), and I was ready to go again. So I fired her up for 10-20s, then shut down and had another look around. This time I noticed rather a lot of oil on the cambelt and down the front of the block - bugger. After a bit of a look, the unpleasant realisation dawned on me that the oil was comming out the front of the camshafts. Thinking back, these were done by the engine shop, not me. I hadn't even thought to check if there were seals in there, or if there should be seals in there. Anyway, it was obvious that the timing gear and cam pulleys would have to come off to see what was up. Given how much of a massive pain in the arse fitting the timing belt is, this was a bit of a downer. 2 steps forwards, one back...
Stripping it down took an evening, to reveal, as I'd suspected, no cam seals at all. Easily rectified, I'd already purchased a set of seals (10 quid apiece, blimey), and they drift in easily enough using the same socket that fits on the crank bolt. That took about half an hour: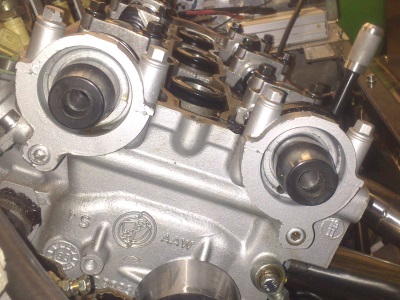
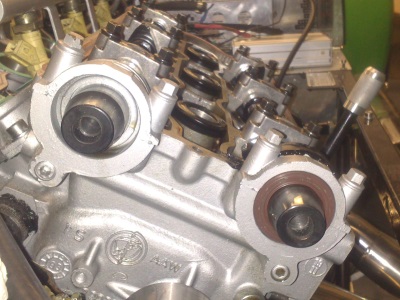 Left - oops, no seals. Right - one seal fitted, 3 more to go...
I spent a fair bit of time de-oiling everything, as of course it had got everywhere. In particular, all over the pulleys, and the belt was well oiled. Now by all accounts this is A Bad Thing for belts, and without covering it in solvent, it didn't look like it was going to come off either. So I just sucked it up and bought a new belt - it would be silly to risk it all for the sake of 25 quid.
Refitting the belt, retiming, and rebuilding the top of the engine took the rest of the week. Timing the cams I can do pretty quickly now, in an hour and a half or so, but setting the tension is still a complete...well. I drafted the missus in to assist, which did help a lot. The problem seems to be that when tightening the tensioner bolt, it must be held absolutely still. The slightest movement and the tension is out, so an extra pair of hands is very useful.
With all that behind me, a free weekend dawned, the weather was good, so it was time to push the car out onto the drive and give the engine a proper run. There were quite a number of things to accomplish with the first proper run:
- Run in the cams - the prime objective! 20 minutes or so at 2-3000rpm is the usually quoted method. This rpm ensures a good flow of oil, and reduces the load on the cams (at idle, the spring is forcing the valve follower onto the cam lobe all the way around; at higher rpms the valve is moving faster and is "thrown" off the top of the cam lobe, applying less force. This is what gives rise to valve float at very high rpm, where the valve jumps off the cam completely.) The whole process allows the cam lobe surfaces to work harden, after which they should be tough enough to stand idling without wearing out.
- Checking the cooling system for (a) function and (b) leaks.
- Checking the gauges
- Hopefully setting the IACV up so that it will idle and start without having to open the throttle manually
- Checking the clutch and actually moving it under its own power
I made a list of everything I wanted to do and check before I started, as it's easy to overlook things when everything's happening.
So out on the drive it went, and started with no problems. And importantly, no oil pouring out of the camshafts! I wedged some cardboard in my throttle linkage to keep the revs between 2 and 3000, adjusting it up or down every few minutes. And basically walked around it constantly, checking everything with a paranoid eye. I had the laptop plugged in to the ecu so I could see everything going on there as well.
And it all seemed ok; the oil pressure went off the scale for the first few minutes, but then settled down, so I assume that the pressure valve was a bit sticky (though I'm not sure why as I'd dismantled and cleaned it all quite carefully). The other gauges all seemed to work, aside from the fuel guage which I need to callibrate; the water temp matched the temp read by the ecu closely so that's all good. The fan came on at the correct temperature, and flicked on and off, keeping the coolant temperature in check easily. And the exhaust headers took on that golden colour as they heated up.
There was one heart-stopping moment about 15 minutes in when it sputtered to a halt; for a terrible moment I thought it had siezed, before realising fairly quickly that it had just run out of fuel! Phew!
Playing around with the throttle a bit showed that there is a massive flat spot above about 3,500 rpm - to be expected really, since I'm sure the base map is very conservative to prevent any detonation or other nasties. But despite that, I could get a taste for how it's going to feel and sound...and I liked it :)
It also showed that there's almost no engine movement, so my stabiliser bar is working and my cam pulleys should be safe from hitting the chassis. And very little vibration to be felt when sat in the car, which is nice.
Here's a walk around the car towards the end of the run-in:
Once the 20 minutes were up, I had a brief play and managed to get an idle using the IACV - just by adding a bit more fuel and ignition advance using the "live adjustments" screen of the Emerald software, just like swinging the distributer on an old car. Dunno how good it is, but it idles and fires up without manual throttle intervention, which will do for now. The air going through the IACV makes rather a loud sucking noise though, probably why Alfa plumbed it into the main air intake.
I also checked all of the electrics while I was there, and everything was working - which means that the wiring can all be tidied and wrapped and clipped into place, finally.
And then, I couldn't resist sticking it in gear and actually driving it along the drive. And it worked! And was easy - no super-touchy clutch or anything, just like a normal car. Hopefully that will stop people telling me that "it won't work, Honda gearboxes go backwards".
On that, putting it in reverse was a different matter - I could barely get it to go in, which wasn't too encouraging. I've since done some research and it seems to be a common "quirk" of these S2000 boxes to be very hard to use when cold. Given that the engine was hot and the gearbox was cold, it seems reasonable that this was the cause. I wondered if the clutch might be dragging and preventing things engaging, so a couple of days later I put the rear up on stands and ran it through the gears - if the clutch was dragging I'd see the wheels turning when the clutch was in. But no, pushing in the clutch and everything slows to a halt quickly so it aint that. I'll just have to hope that warming up the box sorts it.
That aside, the only snag to come out of the run was the breather filter. A bit naive thinking I'd get away with just a filter. To start with, it "smoked" oil vapour like a steam train, before eventually working up to dripping oil out onto the exhaust. So I'll need to fit a catch tank - something like the one I just threw out, I imagine...
20 September 2013
Been doing various tidying up jobs, especially around the wiring to the ECU. It's all a bit of a mess unfortunately - wires going in all directions. It would have been neater to put the ECU in the passenger footwell I think, though it's nice having it easily accessible. There's nothing actuall wrong, it just offends my sense of neatness! I think I'm going to come up with a cover to hide it all and also form a support for the air filter - the one I made previously isn't really playing well with all the wiring.
That's all by the by really. The main driver now is to get the car ready for a rolling road setup (and indeed to work out the logistics of actually getting it to wherever I choose). I think I finally killed all of the oil leaks - was a bit annoyed to find the take off plate for the remove filter had spring a leak, so I had to strip the exhaust, steering column off (again) to get at it. Doing it up an extra half turn seems to have sorted it, though that meant taking all of the unions off and rerouting the hoses.
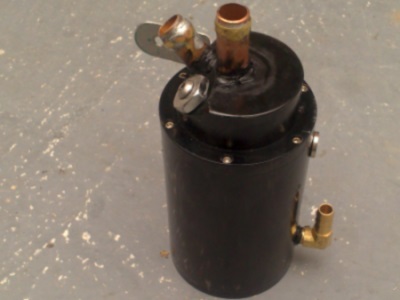
Catch Tank
I've also made a new oil catch tank. I spent lots of time looking for a random container of the right size, but in the end had to settle for a 20 quid ebay special.
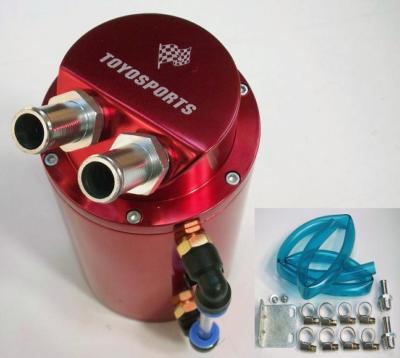
To be fair, the thing is actually very well made. I certainly couldn't buy the materials and machine it myself for that price. The only downside is that it weighs a ton - a welded one would be much lighter (but 100 quid more expensive). You pays your money, etc etc...
It also didn't quite fit my requirements. I have to mount it on its side, I want to drain the oil back into the engine rather than have to empty it every now and again, and I certainly don't need the sight glass on the side.
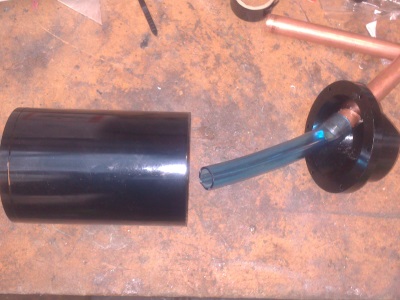
It's actually empty inside, so the first job is to run the input hose right to the bottom. Then you fill it with filter medium, so that the oil-laden air is deposited as far away as possible from the outlet, and must travel through the filter medium to get there.
So, first step, replace the adaptor with a piece of copper pipe and a bit of hose inside. I had to slighty enlarge the hole, and I simply wurthed the copper pipe in place. For filter media I've copied others and use stainless steel kitchen scourers - they seem ideally suited.
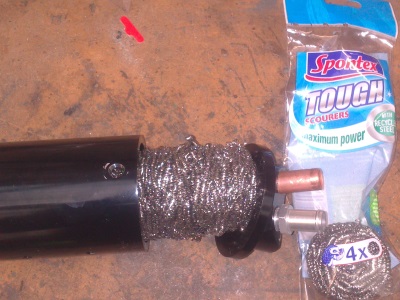
Then I removed the sight glass bit, plugged one of the holes, and put a 90 degree adaptor in the other - this will be my drain (it's going on it's side remember). Because of limited space, I also plugged the outlet port, and replaced it with another one made from copper pipe - a paper filter goes on this. I've used the locost method of soldering a plumbing olive on the end of the pipe to form a bead to hold the hose on. Top tip!
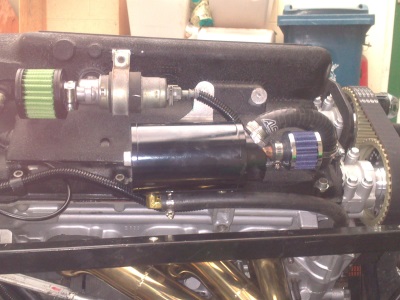
I then needed to make up a bracket to mount it to the engine (itself a bit of a trial - had to try various different approaches before I found something which would work with the existing mounting holes). It all fits, just! Hopefully it'll even work.
Oil Pressure Too High
As I mentioned above, the oil pressure was very high when I ran the cams in, but seemed to come down as it warmed up. Further short runs to test for leaks etc showed that it hadn't in fact settled down, but was always right off the scale when starting up. I thought I ought to sort it out before gettting the thing anywhere near a rolling road.
I did a lot of reading and asked for advice on this Pistonheads thread. I wont reproduce the whole thread here but it has the whole story. I went from wondering if it were the engine lube and vaseline dissoved in the oil causing it to be too thick; whether the pressure sender was wrong; whether the remote sender unit wasn't earthed properly...through worrying about whether there was a blockage somewhere in an oil gallery.
A step-by-step process of elimination showed that the gauge was reading correctly and that it was unlikely to be a blockage. In the end leading me inevitably towards the problem being in the pressure valve in the oil pump itself.
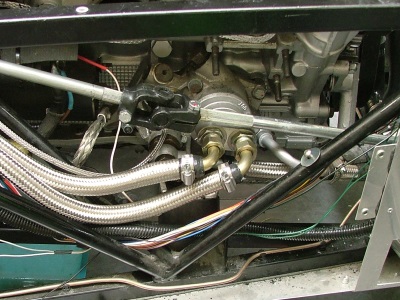
So the other night I jacked the car up, dropped the sump (always sounds so easy doesn't it, "drop the sump"...not "grovel around in oil for an hour with your nose pressed up against the sump with your arms bent in impossible positions while trying not to lose any bolts") to reveal the bottom of the oil pump:
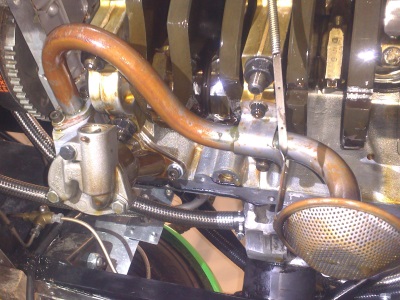
The pump is a pig to get out, but fortunately the bottom cover contains the pressure relief valve and comes off easily with three bolts. The central rotor of the pump drops out when you do this, so be ready to catch it. Oh, and a shedload of oil of course.
With the bottom cover on the bench, it was pretty obvious what I'd done wrong. The relief spring is held in place by a little metal cup and split pin. I had it with the open end outwards (below, left); whereas it should be with open end inwards (so that the spring fits into the cup) (below, right).
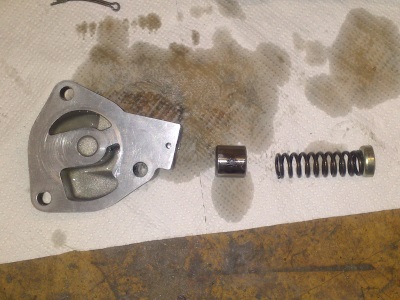
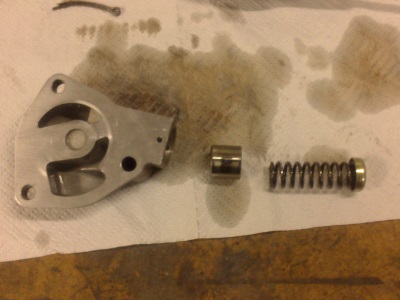
This has the effect of compressing the spring by an extra 4mm or so, hence making the relief valve harder to open and causing higher pressure.
Time was getting on, but I managed to get it all back together that evening, and give it a quick run. I wasn't sure if the pump would prime so I disconnected the coils and cranked it over on the starter. The oil light went out after a few seconds, so it does seem to prime pretty easily - presumably as long as there's a coating of oil over all of the internals it's enough to form a seal and get suction.
So that done, I started it up and happily the pressure was at around 80psi - a good 30psi lower than before and right in the normal range for cold cranking. So hopefully all sorted.