
Gearbox Teardown
Removal
September 2014
Removing the gearbox is surprisingly simple; 3 screws on top, one bolt on the bottom, and it just slides out, complete with leadscrew.
Obviously it wouldn't be that simple, but that's basically it.
The three screws in the top were the first problem. A normal screwdriver wouldn't touch 'em. So I had to resort to secret weapon #1; the drag link socket:

This is a basically a screwdriver bit that fits onto a normal 1/2" square drive. They're rather hard to come by these days, but a friend at work found me this one at stall at a steam fair. (Thanks, Dr. Jones). It was actually intended to attack the four large screws which hold the apron on, but in the end I used it here first.
Unfortunately, that wouldn't touch the screws either! It "cammed" out of the grove no matter how hard I lent down on it. I was ready for this however; it's due to the chisel shape of the bit. The fix is to grind them hollow, or parallel, which removes the camming action.
So a quick blast with a flap disc later:

...and the screws came out with only a small amount of grunting required (left). A gentle tap with a runner hammer and the leadscrew just pulls out (middle). I just had enough room before it hit the garage wall!


And finally it was out and on the floor:


The Leadscrew comes out first, held in by a simple nut on the end and the pressed-on gear. Loosening the nut is by the usual "jam the gear with a bit of softwood" approach:

Easy enough. The leadscrew, as I knew, is rather worn in the middle where it gets most use. Another decision as to whether to leave it or replace it:
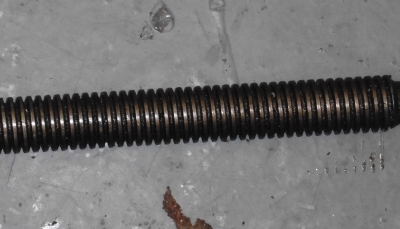
 Left - end of the leadscrew with no wear. Right - worn middle section
And on with the gearbox proper. I found the rebuild book to be invaluable during this process (and more so during the apron disassembly), so I'd thoroughly recommend it. I'm not going to show every step here as it's so well detailed in the book.
After removing the dish on top of the box, and the selector bar from underneath it, the shifter and its rod are removed. This was my first encounter with one of the widely-feared taper pins, but no problems here:


The "cone gears" come out next; first the bushing screw is removed:

Then the locknut which holds the shaft in place needs to be loosened, and the shaft can be gradually tapped out to the left, taking off each gear as it becomes free. The locknut is very thin, and there is very little clearance to get at it, so a thin spanner is really needed. I didn't have anything the right size, so I ended up with a bit of a bodge. I had an old bike headset spanner (for old style, pre-1990s headsets, before the improved "Aheadset" came in which adjusts just with an allen bolt), which was nice and thin, but too large across the jaws. So I shimmed it with a couple of bits of scrap steel (arrowed). Fiddly, but did the job without needing to buy a special spanner just for this:

I then removed the gears and threaded them onto a length of wire as they came off, they can then be cleaned without losing them or getting anything the wrong way around.

The dog clutch shaft was a bit easier - it's just held in by a setscrew on one side (below, left) and an offset taper pin on the other. This last requires blocking the gears again to prevent it spinning while you hammer the pin out. The book says to use a brass block, not having one I used one of the bushings out of the tailstock (arrowed, below right). I thought I'd start with that and give it a gentle tap, and look for something softer if it looked like I'd need to really belt it. But the pin slid out pretty easily.


Finally (and actually I should probably have done this first), I removed the brass speed plate from the front of the box. It's held in by what, to my untrained eye, appear to be rivets. But they are something called "drive screws". These are a kind of self-tapping screw with a very high helix angle, and a rounded head. They are hammered into a hole and not intended to be removed again. So in order to remove them, you need to cut a slot with a Dremel and a fine cutting disc, and unscrew them. It's actually quite hard to make a neat job with the Dremel, it requires a very careful, steady hand. They all came out easily once the slot was cut though.


A few people on the Practical Machinist forum have repainted these plates, so I will probably give that a go while it's off.
Again, much brushing with white spirit was involved to get the gunge off of everything. I've just bought a jetwasher, and found that to be really useful when it comes to cleaning up the large castings, after getting the worst of the cack off. In the case of the gearbox, it revealed something quite interesting (well, to me). The original paint, underneath the blue paint it was wearing when I bought it, in turn covered by my green. So originally it was a creamy/buttery kind of colour.

I might go for something similar when I redo it; if not I quite like this sort of pale grey:
 Picture of tex-VA's lathe, taken from this Practical Machinist thread. Some impressive craftsmanship on display there!