
Or not...
18th September 2012
So with everything planned for the exhaust, transport arranged and ready to go, the original manifolds delivered down to the factory so that they could get an early start by using them as a pattern for the manifold flanges, the Gas people come along and dig 3 dirty great trenches across the road and my drive. So no way of getting the car out or a transporter in! OK, not a total disaster, I've just had to rearrange everything for a couple of week's time. Bit of a pain though, and I hate messing people around. Fortunately they've all been fine about it.
Fog Light
So in the meantime I've taken the opportunity to do some of the odd jobs which build up. Some small things like gluing bits of trim on and the likes, and a few larger ones. The first of these was resetting the fog light so that it was vertical (and the reversing light which is paired with it so that they match). It's only the fog which has to be vertical, bizarrely. Slow and messy to file down the light housing, enlarge the hole in the grp etc, but I think it looks much better. So I'm not going to complain! Very little room between the back of the light and the fuel tank, just a couple of mm, so I feel quite lucky it fitted.
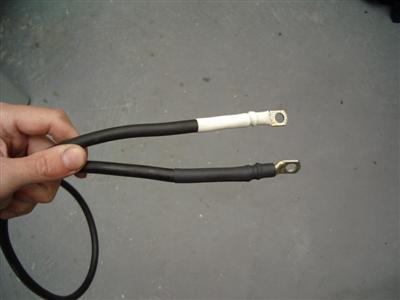
Battery Cabling
I'd bought cabling and connectors to make the battery earth lead from, but hadn't got round to it. Easy enough, though my soldering iron wasn't man enough for this large (20mm2) cable and connectors - so I heated it with a blowtorch instead, which worked fine.
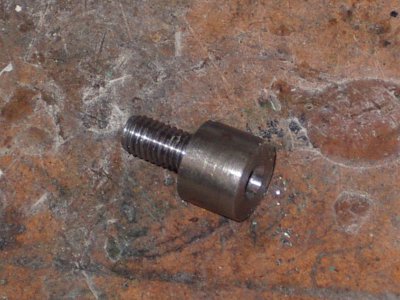
This bolts to one of the threaded bosses I'd welded to the chassis previously.
For the live, there are two cables. A smaller one which powers the main loom, and a heavy duty one which goes directly to the starter motor. The shape of them meant that they both wouldn't fit on the battery terminal (which is just an M6 threaded stud). So I turned up an extender, threaded M6 in the bottom, with a longer M8 stud on the top:

A couple of terminal covers finish it off - obviously the cables will be tied down neatly when it's finished.
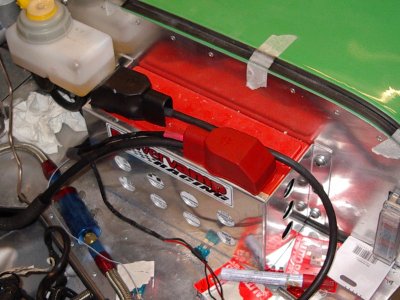
Starter Motor
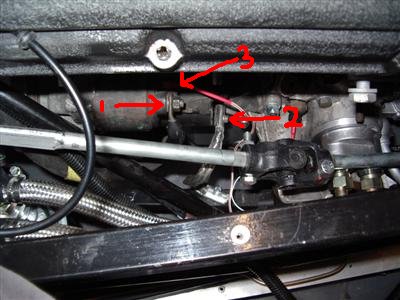
While I was in the engine bay, I wired up the starter motor. The connector from the starter button was on already, I just needed a heavy duty earthing strap to the chassis. I made this up from some earthing braid, crimped at both ends with some 1.5mm aluminium sheet, which I bent on with a vice and a hammer.

The heavy duty live cable to the solenoid (1), the earth strap goes onto the back of the main body of the starter (2); and thinner cable from the starter switch to the spade connector on the solenoid (3, just out of sight).
So it was all wired up, I thought I'd better test it. Car out of gear, turn on ignition, fuel, press starter. Apart from sounding like a rifle shot as the solenoid actuates, the motor was spinning but didn't sound as if the engine was. Just a very fast whirring, rather than the usual "ruuUH-ruuUH-ruuUH" kind of sound. So I thought for a horrible minute that it wasn't engaging, something was measured wrong, it was all a disaster. But turns out that all is well, the engine was turning over, but with no plugs in there's no compression, so it spins very smoothly and easily. Job Jobbed! And feels like another milestone, another bit of the car comming to life.
It's also a good idea not to leave the cable to the starter connected whilst working on it, otherwise you've got a big naked live terminal sat there, which is easy to short to the chassis or engine block with a dropped spanner. Oooooh, sparks. Ask me how I know...
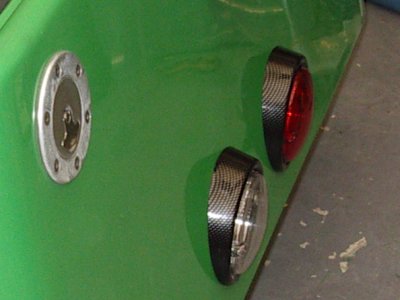
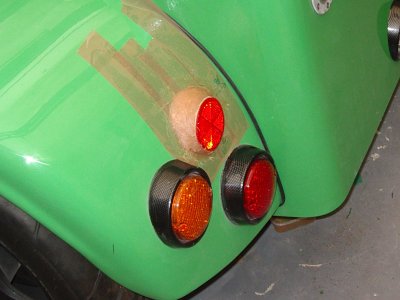
Reflector Plinths
For a while I've been wondering how to attach my reflectors. I wanted them in a cluster on the arches (yes, I'm blatantly ripping off Iiyama's car, because I think it looks great). Unfortunately, the arch is too curved for the reflector to sit on; Iiyama made his own arches because he's a carbon fibre wizard. Since I couldn't find any plinths for 60mm reflectors, I thought I'd try my hand at making some.
So I covered the arch with parcel tape (its shiny surface means that the fiberglass doesn't stick), and built up a large rough plinth of GRP filler paste:
Then removed it, found the centre, drilled out and mounted on an M10 bolt. Mounted this in the lathe chuck, turned the crosslide to an appropriate angle, put it in backgear (i.e. very slooooooow so that it didn't fly off/explode) and turned it down to give a nice even conical shape:
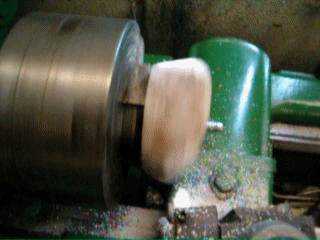
Wasn't sure if it'd work, but it's not bad. Only a rough finish so I'll need to fill and sand, but nice and symmetrical.
It's quite a heavy lump, so I'll probably drill out the centre somewhat; then spray in the green paint I've got left over from doing the bonnet bulge.