Rear Lights
15th March 2012
I ordered a set of rear lights (so much for my idea of having a cheap month!). I've gone for 95mm round lights, LEDs for indicators and brakes, ordinary bulbs for reverse and fog. Normal lights are a bit cheaper, but I like the instant on/off nature of LEDs for brakes and indicators, whereas it's not really important for the other two.
I'm also a big fan of having separate brake and indicator lights - I find that in a number of modern "bullseye" type lights, the indicator often gets lost when the brake light is on. They look very neat, but aren't as functionally good in my view.
I spent a fair bit of time mocking up light placement to see what I liked the look of, and also making sure that everything complied with the rules in the IVA manual. Fortunately, this is not difficult, you'd have to do something quite unusual to break the positional requirements. Then it was straight in with the drills, dremels and files to hack great holes in the rear tub and wings. Another one of those "easy but fiddly" jobs, with a lot of time spent lining everything up nicely.
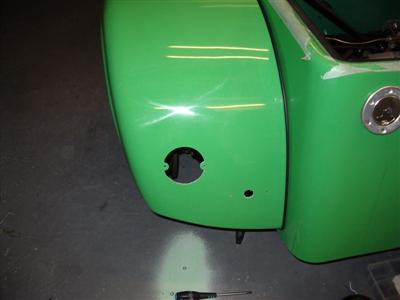
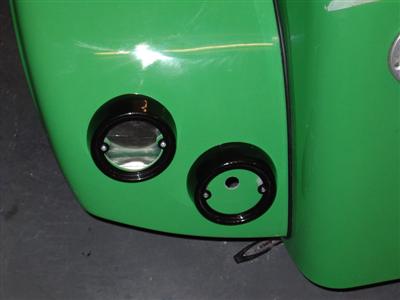
These lights are made to fit plastic surrounds which just bolt onto the bodywork. Because of the curve of the wing, I had to trim the outer two surrounds quite severely to get the lights to line up. This meant a large hole in the wing, and the back of the light itself protruding quite far into the wheel arch:
Now although these LED lights are sealed units, I don't really like the idea of them sitting in the wheel arch, eating all the mud and water off the tyres. So I made up some aluminium covers to give them a bit of protection:
I've also sealed the light surrounds with silicone sealant (less messy to clean off the bodywork than wurth), a) to keep out water which runs down the wings, and b) to hold them in place if I take a light out, so that I only have to line everything up once.
Also, the wires on the light units were very short, and I didn't really like the idea of having the connectors sitting in the wheelarch. So I've soldered on some extension leads, then covered the whole lot with heat shrink, so that what's exposed to the mud is all watertight.
I didn't mind that too much, but I was a bit annoyed when I found out that the leads comming off the loom for reverse lamp, fog and number plate lamp where nowhere near long enough. A bit disapointing given that the loom is designed for the car. I presume that if you buy the standard light kit then everthing fits - but for the sake of an extra pound's worth of cable it seems a bit of a shame to cut everything so short. Anyway, much more crimping, soldering and heat shrinking later and everthing reached where it should.
To get at the wiring loom, I needed to remove the rear tub. So while it's all off, I figured I'd test all the lights before I fitted them all properly. Good job I did...
First thing I noticed was that the fog lamp I'd ordered wasn't. It was only a chance re-reading of the IVA manual where I spotted that all lamps need to be "E" marked, but the fog lamp must also be "F" or "B" marked. Mine wasn't, so I did an internet trawl to find out what these obscure markings meant. It was quite hard to come by, so I've put what I found on my lighting information page
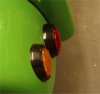
What I had was a stop/tail light, with codes "R-S1". No problem getting it swapped though, and the replacement came through in a couple of days. Here it is, with the correct "F" code (on the far left) and E marking (middle)
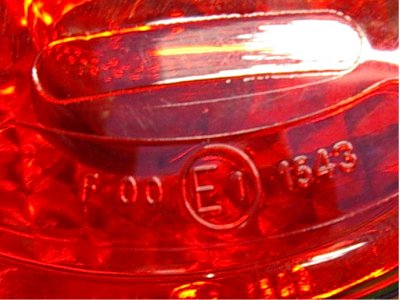
A small thing, but it'd be highly annoying to fail IVA on something like that - very easy to miss!
So then I wired everything up, fitted the steering column switches, and tested it. Initial results - 1 sidelight works, no brakelights, indicators work but didn't flash, no number plate or reverse light. Okaaaaaaay....
The brakes turned out to be easy, just a loose connection. The sidelight, reverse and number plate light are all on one circuit which is not being powered, and I can't work out why. It looked as if there was a connector in the wrong place in the loom, but connecting it up for a quick test shorted the whole lot out and blew a couple of fuses (good things, fuses), so I'm not sure what's going on there. After spending a whole evening looking at it, I gave up thought I'd put it on the "back burner" and look at the indicators.
Well, I had a few problems here. Number one, I'd somehow completely avoided wiring them up to the flasher unit. That won't help. So I did that, but still no flash. Number two, turns out that the flasher unit supplied only works with incandescent bulbs. It relies on the current flow to heat a bimetalic strip, which then snaps in and out of contact. So, I ordered an electronic flasher relay. This came and was fitted, still no flash. I tested it on the bench and all was fine, so it was back to tracing wires through the loom. During which I forgot to disconnect the battery and blew the fuse again, D'oh. Finally I worked out that I'd wired the flasher to the headlight terminal of the switch, not the indicators. The whole lot took about three seperate garage sessions, but I got there in the end!
I've also had to add in a separate circuit to handle the hazard switch - it seems that the standard Sierra switch does all that internally, but I'll need to wire mine in separately. So more pulling the loom apart and adding wires and diodes. Moral of the story so far is, don't tape up your loom and tidy everything up until it's all tested!
13th April 2012
Work on the car has been a bit sparse of late, it's spring and that means fence and summerhouse building in the garden...in the rain and snow. I have however managed to finally get the lights sorted.
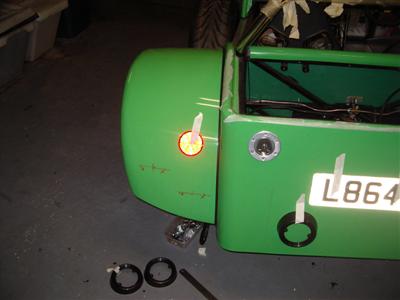
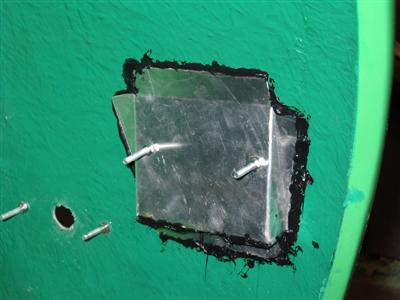
I managed to trace the reason I kept blowing fuses, by trial-and-error. Basically I disconnected everything in the circuit in question, then went back and connected each thing in turn until the fuse blew. Turned out to be the number plate lamp. Being a simple lamp, I'd assumed (wrongly) that it didn't matter which terminal was +ve and which was earth. However, one of the terminals is connected to the whole body of the fitting, intended to be earth. It just happened that I'd attached live to this (they weren't labelled so I don't feel too bad), thus making the whole case live. And for testing, I'd layed all the lamps on the fuel tank as you can see in the image above...
So everytime I connected the circuit, it shorted straight through the lamp casing, onto the fuel tank, and back to earth, blowing the fuse. Easily fixed by swapping the terminals around, but what a faff to find!
I was still left with an apparent flaw in the loom, I dunno if I'd put some of the connectors on wrongly, looking at it it doesn't seem that there's a different way to do it, but it means that the live feed for the offside sidelights, number plate light and reversing light doesn't seem to connect to the wire which takes the power to the lights. Whatever, I rewired the bit of the loom concerned and finally, everything worked.
High-Level Brake Light
I also decided to fit a high-level brake light after reading a few forum posts where following drivers had not seen the very low brake lights. I've fitted to the rollbar to get it as high as possible, unfortunatly this does mean having a visible wire running down the inside of the rollbar. However it's not really obvious, and I'd rather have the extra safety from morons behind me. This "high level" light is about at the same height as a normal car's standard brake lights! These cars are loooooow!.
It was easy enogh to wire in, I just spliced on a new pair of connectors from the nearside brake light. I did need to make a couple of small aluminium spacers to go between the light's "feet" and the rollbar, to take account of the curved surface. I just did these with a half round file, just to get a nice fit, then used a drop of black silicone sealant when I fitted it all to hide any remaining gaps. Looks pretty good, but I forgot to take any pictures!
So with that done, it was time to put the rear end on, hopefully for the final, last time...
Rear Tub & Fuel Filler
Although I'd fitted everything previously (several times, in most cases), it proved quite time consuming to do the final fit - several evenings. The fuel tank, boot floor, rear tub, fuel filler, arches, and lights, all needed properly bolting in, torquing up, and checking. I also had a false start where I got the tub bolted on as far as the final two bolts, then realised that one of the wires had fallen down under the fuel tank and was pinched between it and the tub...so the whole lot had to come off. Aaaargh! Not my most productive evening, that one.
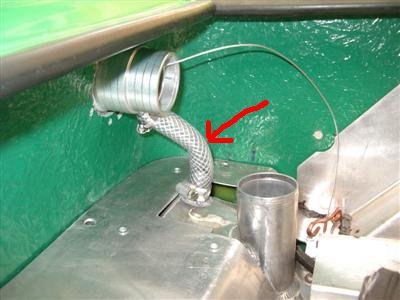
The hardest bit proved to be the fuel tank filler breather. This tube is to allow air to escape the tank quickly while filling, to prevent fuel foaming back out of the filler neck (as distinct by the breather/rollover valve which is to allow pressure to equalise whilst on the move). Unfortunately, the arrangement of the output on the tank and the connector on the filler neck makes it a very tight bend for the pipe. I ended up buying some more flexible PVC fuel pipe (Dax supply a super-reinforced 20bar rated hose), heating one side of it with the heat gun, bending it into the shape required, then holding under cold water, in order to get the bend without kinking. Seriously, one of the most annoying things on the whole build, not least because it's so small! However I wanted to get it as good as possible, as I've heard of some cars where it's very slow/difficult to fill the tank, because this breather isn't working properly. I'd rather take the pain now than every time I'm at the pump...
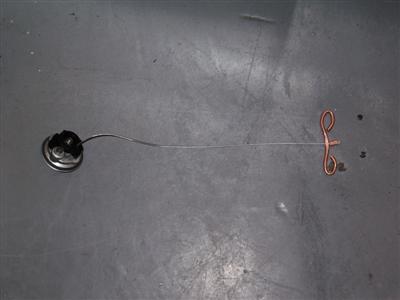
You might also notice the tether cable comming out of the filler neck. For IVA, your filler cap must either be tethered, or be lockable, with the key being impossible to remove when the cap is off. All intended to stop you leaving the cap behind. On a related note, for CAT-equiped cars, it used to also be necessary to fit a restrictor in the filler neck, so that only an unleaded nozzle would fit. However with 4-star no longer available, this requirement has been dropped - I confirmed with VOSA who were very helpful.
Anyway, the tether. As (it turns out) many others have done, I used a bit of spare throttle cable (itself a mountain bike brake cable), and made an anochor out of old brake pipe, crimped onto the cable using a vice. This pushes into the tank, then turns and blocks across the opening, stopping the cable pulling out. The cap (Dax-supplied) handily has a couple of holes into which the cable will just fit, and another bit of pipe crimped onto the end stops it pulling out:
So with all that done, I could fit the filler cap, filler pipe, and bolt down the cover. Fit the lights, get it back on its wheels, and stand back and look at a job well done.
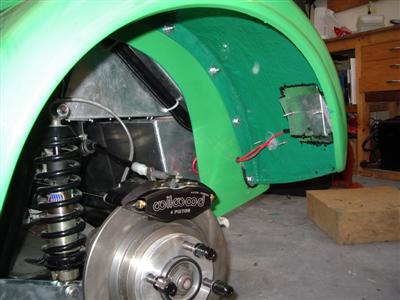 View inside the wheelarch. Extended cables from the lights encased in heatshrink so no exposed connectors. Aluminium cover for the rear of the indicator. Exterior grade silicone sealant used to seal the cable holes - easier to remove than wurth!
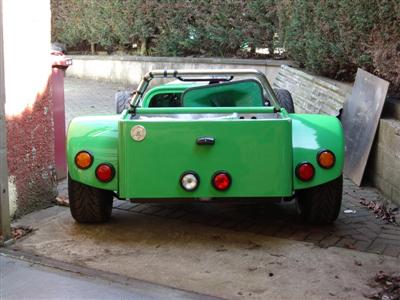
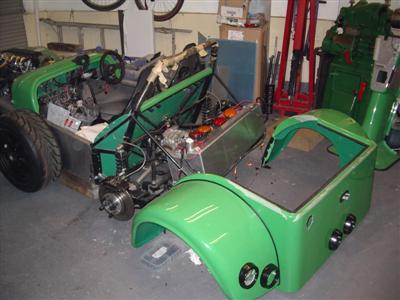
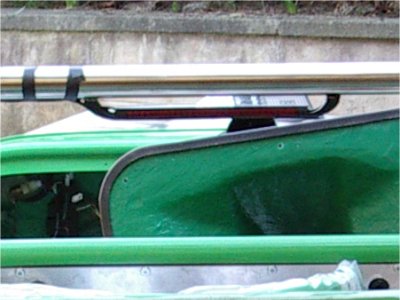 RH image - High-level brake light visible under the rollbar. The wire wasn't bonded down at this point, hence all the black tape!
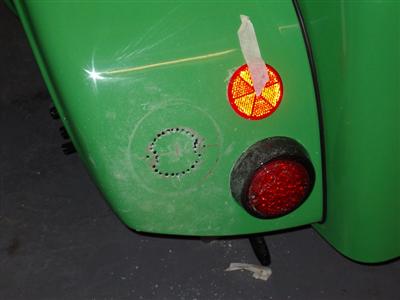
Still need to put the reflectors on, but I haven't decided where yet. I really want them on the arches, above the brake and indicators - but the surface is very curved so I'd have to build some sort of holder. Otherwise they'll just go on the tub.