Oil Filter/Steering Interface
27th October 2011
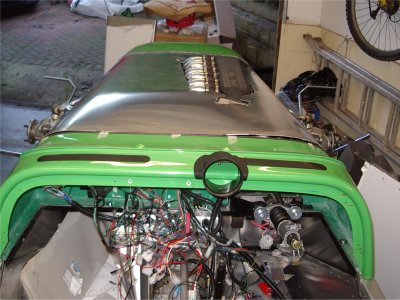
I don't of course want the oil filter and steering to interface, I want to keep them separate! After a chat on the Dax Forum, Pete F suggested that you can often find room by tilting the steering column; so I thought I'd try that.
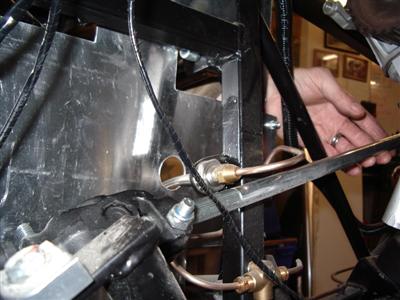
This unfortunately meant dismantling it all, removing the bearing from the bulkhead, and enlarging the hole in the bulkhead to enable the column to tilt. But it does look as if I could get clearance that way (below, left). The downside is that it then gets too close to the brake line (right):
I've ordered an oil filter so that I can see exactly what I'm dealing with. I've no feel for how much the steering column moves in use; by heaving on it, I can (just) get it to touch the brake line, and no doubt the filter as well. I could fairly easily attach a metal rod to the engine block to stop it hitting the filter; and I could move the mounting for the brake line up by 15mm or so. (I'd have to cut it off and reweld it, which is a PITA, but in reality that's only an hour or so's work.)
It may be the case that a take off would give me a bit more clearance, depending on how it sat; if the fittings run horizontally, then I'd actually gain a couple of cm, and wouldn't have to move the steering so much:
So I think I will wait for the filter to arrive, and see how it looks. If it's a bit too tight for comfort, then I'll probably have to buy a take off plate and see how that fits. Basically, I want to avoid messing with the oil thermostat if at all possible, because I've no way of testing it or checking it, and if I get it wrong, I could kill the engine. The other thing to check is that all of this doesn't mess up the steering wheel position too much.
Other bits
So that's in progress. I've managed to get on with some of the other odd jobs on the car, with a view to getting the thing on its wheels by Christmas. That will unlock a whole load of new jobs, such as fitting the rest of the bodywork, lights, setting up the suspension, and everything else really. I recieved the lock nuts for the alternator adjustor, so that's finished; and spent a whole day of garage time having a clear out. I threw out a lot of old alfa bits that I am now definately not going to need and rearranged my various crates of bits so that I don't have to look through them all every time I need something. I also packed away a lot of my lathe tooling in crates with moisture absorbent crystals, as condensation over last winter caused me rust issues.
Scuttle / Sides
I reckoned that I could now fix the scuttle, I don't think I'll have to take it off again. Easy enough, but it occurred to me that I also wanted to be able to get the flared side panels off easily for future maintanence, and they go under the scuttle...
All it needs, in fact, is the ability to slacken the bolts holding down the scuttle sides, and the aluminium side panel will pull out from under it. All I needed to do was to make sure that the scuttle bolts were accessible with the dash in place. I had to trim the underside of the dashboard a bit to allow this. A couple of hours spent now which should save much swearyness later on.
Then I needed to cut some wing piping to trim the join between the scuttle and body. I've only used it up to the start of the side panel, otherwise you get a wonky looking join where it steps up over the side panel. I think it looks neater like this, other opinions are available...
Also on the scuttle, I've been wondering what to do about the demister vents, which I need to cover somehow. I've been thinking about it for a long time, and had considered covering the top of the scuttle as some westfields do:
But I always think it looks a bit odd, the way it just stops. So I thought I'd try something more minimalist, and cut a few shapes out of card. I then shortlisted a few and made them out of ally. To my eyes, the smaller covers looked better. It also helped to have a surround for the guage pod to sit on, as it goes partly over one of the vents. So I went with the ones I liked the look of, and painted them in crackle black to match the guage pod. I've yet to stick them on (wurth will be the way I think), but here's a mock-up:
Brakes
I've also spent a lot of time trying to figure out brakes, which seems more complicated than it should be!
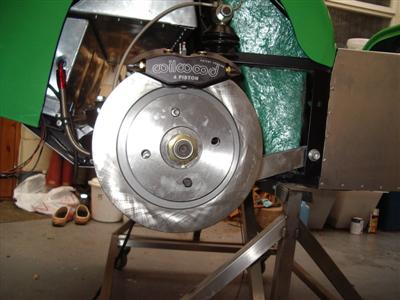
As mentioned before, I'll be using Wilwoods, which seems to be the only real choice if you don't want (very heavy) standard Sierra parts, or (very expensive) stuff like Brembo, AP etc. I'll also be using large Sierra Cosworth 283mm discs up front (seems to be the most common choice on car-engined Rushes), and 253mm Xr4x4 disks at the rear.
The Cosworth disks are a direct fit onto the standard sierra front hubs, so no trouble there. The Cosworth did use a different front upright with a different brake calliper mounting, so you can't just bolt a cosworth calliper to a standard hub. BUT Willwood callipers are generic items, which use various mounting adaptors to fit the calliper to whatever upright you have. So (I think) it's just a case of getting the right adaptor. The rears should be easier as the disk is the standard fitment for the Xr4x4 rear hubs I am using.
Still with me? Good!
Now many people have squeal problems with Willwoods. Following Pete F's experiences, which were by all accounts particularly bad, I'm going to copy the setup he found which doesn't squeal. Don't know which bit makes the difference, but it seems a sensible starting point to use a known good setup. He's ended up using groved, rather than plain disks, so I've bought a pair of those which arrived just today:
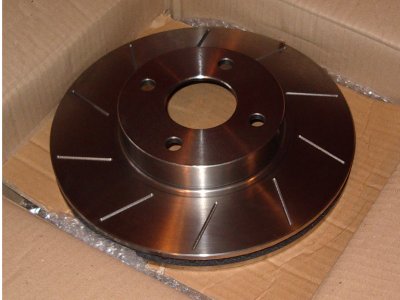
The consensus seems to be "a disk is a disk" so I haven't gone for something black and uber-expensive, just some generic ones from ebay. They look more than enough for the job!
The rears should also be arriving soon, and I'll get the callipers ordered over the next week, with wheels to follow next month.
8th November 2011
Quite a lot seems to have happened since the last update, I'll try to get it down in a sensible order. I ordered and recieved some 253mm rear disks, and set about trying to work out which callipers I'd need.
The whole "world of Willwood" is a bit opaque, at least to me. There are mounting kits and spacers and different piston sizes, and very little advice to be found about how it all worked or which bits you need. I intially looked at Midlite callipers for the front, only to be presented with a choice of piston size. Hmmm. Quite literally no idea. The choice runs from 1.25" to 1.75"; and I understand the basics, that larger pistons at the calliper mean a longer pedal but less force required(all else being equal).
So I spent a good few hours on the internet reading up, and eventually happened across Jake Latham's brake calculator which is a fantastic bit of kit. You can specify everything from tire width to piston diameter to the position of the balance bar, and it outputs pedal travel and a number of other useful parameters. So you can easily play with different calliper piston sizes and see how it affects things.
The upshot seems to be that I could get anywhere between a very hard pedal with 1.25" of movement, which would be about on the limit of usability; or a much easier one with 2.5". I particularly don't want a very long pedal, but 2.5" would be fine.
Anyhow, all this turned out to be a bit in vain. When I spoke to Rally Design, it turns out that you really need to buy one of their kits with all of the fittings, otherwise you have to make your own adaptors up to actually mount them. Then you don't get to specify the piston size anyway! So I went back to other Dax owners and asked around, and it seems that what you get in the kit is fine, not too much movement and allows heel & toe braking.
Of course, I'd already bought disks, and the Rally Design kits come with disks - so I didn't want to have to buy another set. Plus they only do plain or drilled, and I particularly wanted grooved. Happily, the kind folks at RD were happy to sell me kits without disks. Except at the rear, where there isn't a kit for the 253mm disks I'd bought, only for 273mm - so I had to buy their disks. Fortunately the rears were cheap anyway, only 30 quid, so not too much money lost. Hopefully I can sell the 253s and recoup some of that.
So in summary...the front kit is part number BK5K, for a 283mm disk on standard Sierra upright, without disks. And the rear is a BK67 kit, Powerlite handbrake callipers to fit Sierra hubs from a disk-braked donor.
So that little lot arrived in a couple of days, which was quite exciting:
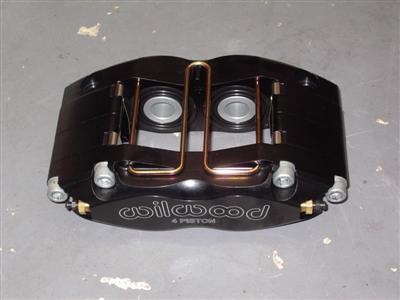
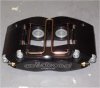
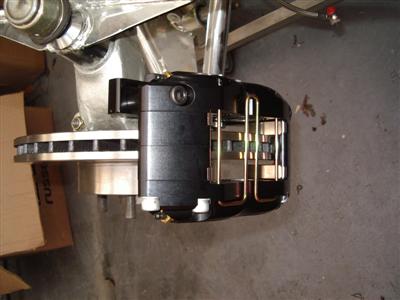
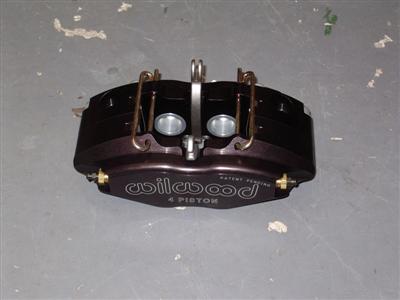 Left - "Midlite" 4-pot front calliper. Mahoosive thing! Right - Powerlite 4-pot rear calliper, with handbrake mechanism
The callipers are radial mount - that is, the bolt holes run vertically down through the calliper body. The ford uprights are lug mount - the bolt holes are horizontal. So there is an adaptor, just a block of ally, which lets you bolt the two together. Also a couple of spacers which control the distance of the calliper away from the mounting and hence the centre of the wheel. So different disk sizes can be accomodated just by changing the spacer size.
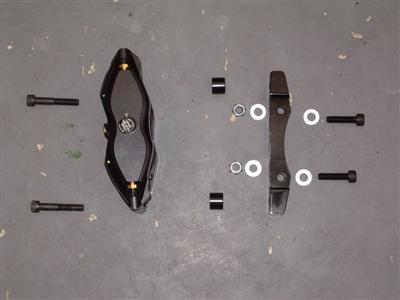 Left to right: Calliper to adaptor bolts; calliper; spacers; adaptor; adaptor to hub bolts. These last bolts actually bolt downwards through the visible holes in the adaptor (would be into the floor from this angle)
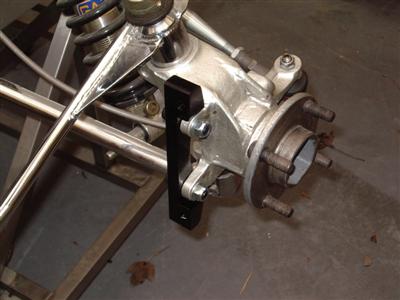
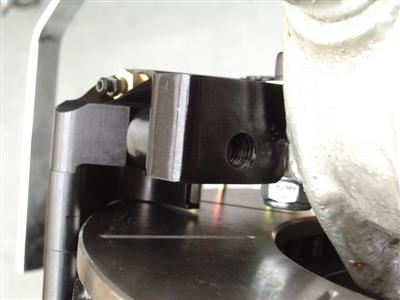
Adaptors mounted on the hubs: Left is the front, right is the rear.
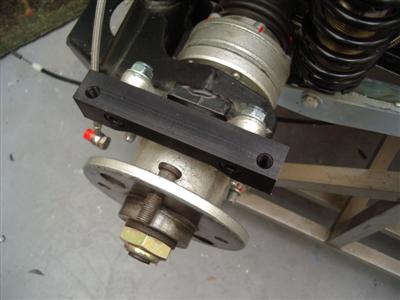
...And callipers mounted on adaptors:
All easy, bolt on stuff you'd think. But no. First problem, the mounting bolts are too big for the holes in the front calliper (rears are fine). They must have zero tollerance, and then the anodising makes them actually too small. I'd read about this on a forum or build diary somewhere, so wasn't entirely surprised, though it is disappointing. Anyway, a quick run through with a 10mm drill sorts it out.
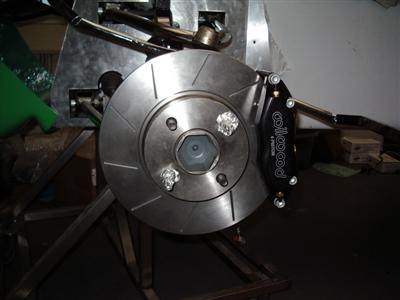
Worse, up front, the disks are a couple of mm out of line with the callipers:
I tried fitting everything the other way round and on each side, but still the same. I can only assume that the disk has a slightly different offset to standard? Hard to imagine that they'd drilled the holes in the adaptor wrongly (although you never know). I pontificated and pondered, and in the end just spaced the adaptor out using a couple of washers, which makes everything fine again. And also means that, if I ever get new disks and they have a slightly different offset, I can just remove the washers. Again, disapointing if not desparate.
Another thing "not quite right" is the mounting bolts. Nice superstrong 12.9 grade ones. However, the adaptor-to-hub mounts barely peek out of the end of the nylock nuts. General "rule of thumb" is that there should be at least 3 turns of thread showing, and is often checked at IVA. Equally, the calliper-to-adaptor bolts leave a good 10mm of thread in the adaptor unused:
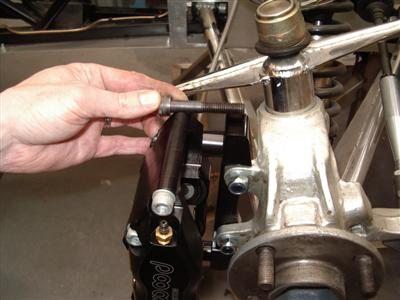
Now while part of me thinks "it must be ok, that's what they've supplied", I can't help thinking that it's no good having a mega strong bolt if it's only screwed into 10mm or so of aluminium. Surely you'd want to use all of the thread available.
So the upshot is, as usual, that I've bought some more, longer bolts, at yet more expense.
And then, the final turd in the waterpipe, (to quote Blackadder), is that the flexi lines supplied by Dax have a different fitting to the callipers. So I'm going to have to get new ones of those made up as well. Another hidden "gotcha". This will mean that, of the brake kit which came from Dax, I've only used a couple of connectors and the two master cylinders. So if I ever do this again, I would not bother buying a manufacturer brake kit, which would probably save a couple of hundred beans.
Oh, and out of interest, I tried to see what size pistons these callipers have. Unfortunately, it's impossible to measure without taking them apart, as the dust seals hide the edges of the pistons. There are a couple of numbers stamped into the callipers, but none of them match the part numbers on the website. So who knows...
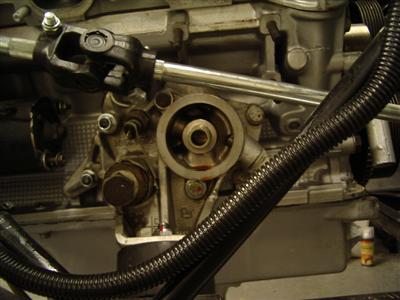
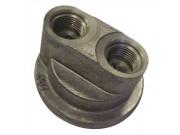
Oil Filter
...arrived, I fitted it, and there aint no way that the steering is going to clear it:
![]()
So I've ordered a take-off plate and will have to see if that's any better. I spoke to Craig at Dax, and he says that they work to 1/2" clearance between the steering column and anything else, going down to 1/4" as a safe minimum. So I have a good idea of what I can live with.
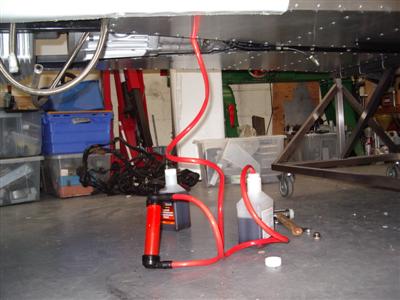
Oiling the Box
Filling the gearbox with oil has been on my list for ages. A bit of research on the web gave me a few pointers - the easiest way seems to be to use a transfer pump and do it from underneath. I'd picked up a pump at a country fair for a fiver, and bought 2 quarts of Amsoil Synthetic Manual Transmission Fluid (MTF) online. These boxes seem to need a good MTF oil, not just diff oil or whatever.
The s2000 gearbox has the drain and fill plugs quite close to each other, towards the rear. This is the view from underneath: F - fill, D - Drain:
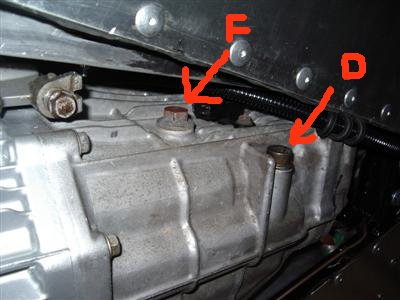
Easy enough to get at from underneath. Then using the pump, very simple to fill up. It took both quarts and the oil level just reached the lip of the fil plug, which is a bit more than the 1.6L quoted capacity.