Winter Fettling 2014-2015
January 2015
With Christmas over, I was nearly finished rebuilding the lathe, or at least had reached a point where I was waiting for parts, so it was high time I got on with my snagging list on the car.
Diff Change
The biggest of these was to change the diff for one with a higher gear. The new one (3.14 LSD) had been sitting in my garage for months so I had everything I needed.
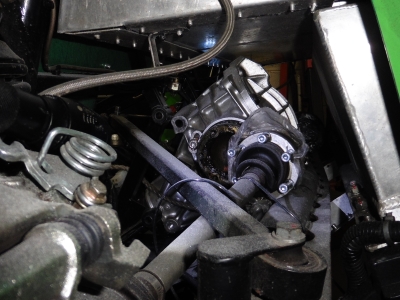
The big question was, would it come out of the bottom, or would I have to remove the whole back end and lift it out of the top? I'd been told that it would come out underneath, so I thought I'd try that first.
A quick investigation after jacking it up and removing the undertray showed that, either way, the tunnel needed to come off to get at the front mounting bolts:
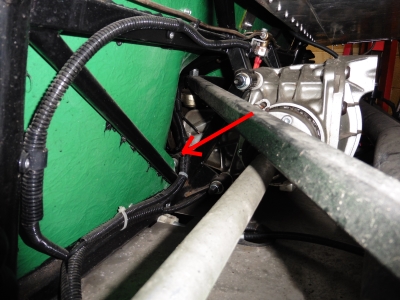
As it happens, I needed to get behind the dash later anyway, so this wasn't as much of a pain in the arse as it otherwise might have been. A couple of hours saw the dash, seats and tunnel all out. I had a good look around while I was doing it to check all of the various connections and fittings, everything looks fine which is nice.
 It's like going back in time about 3 years...
So removing the driveshafts, propshaft bolts etc was fine - it's cramped and awkward, but no major hassles. I put large cable ties (actually tree ties I think, but much the same thing) around each driveshaft and the a-arm to keep them up out of the way, otherwise they tend to fall down - you don't want one clouting you on the head as they are heavy.
I put a scissor lift under the diff - it barely fits but did, just. Then could remove the diff mounting bolts. Again access is a bit tight but ok. One minor problem was that I'd put the fuel pump right in the way of one of the long bolts. Fortunately, by undoing the jubilee clip and a bit of wiggling, I could just sneak it past.
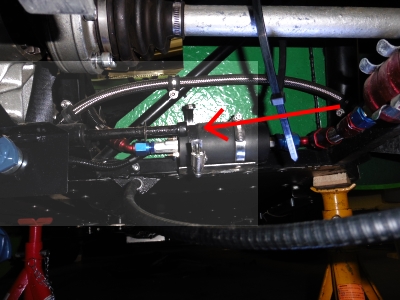
As it happened, only a minor inconvenience, but would have been a serious problem if I'd had to take the fuel pump off - something to consider when mounting them.
So, would it actually come out?
The problem is that it needs to go backwards (to the right in the pic) about 4 inches so that the front can clear the main transverse chassis rail; but the de dion bar is in the way. The big mounting lug at the top of the diff is an added complication.
A good deal of wiggling the thing (bear in mind, it's 20Kg and to maneouver it you're lying on your back with your face about 2 inches from it - quite tricky) showed that it would almost come out. It will lift up and back, so that the rear of the diff goes over the de-dion bar. The nose can then clear the chassis rail and drop down. What was stopping this happening in my case was the bottom of the boot. In the standard Rush, the boot tray is a fiberglass insert which would be easy to lift out. However, I'd made my own in the interests of increased storage space, and it's not removable without removing the whole rear end (in the interests of being strong and sealed from spray comming off the wheels). Once again, I'd made things hard for myself, but then that's nothing new.
I tried a few things to increase clearance - removing the diff rear cover was one idea, but I couldn't get purchase on a number of the screws, there's just no access. I also tried removing the A-Arm balljoint which is just above the front of the diff - getting rid of that would probably allow it to slide forwards and drop the rear down. However, the arm was so firmly wedged onto the balljoint taper that I think you'd need to get it out onto a bench to bash it out - again I couldn't do it in place. I briefly considered removing parts of the rear suspension and maybe move the de-dion bar back a bit, but as I recall that's all very, very heavy and extremely difficult to get back in position. So I didn't really want to go there. Another idea would be to chop a hatch in the boot floor; that'd work but it would mean having sticky-up bits in the floor which I'd carefully designed it not to have.
After sleeping on it, I decided that chopping more from the mounting lug would be the way to go.
This is not easy.
I could just reach it with an angle grinder, which I used to get about halfway through - but it was all a bit fraught being that close to the fuel tank, at arm's length. So I did the rest with a hacksaw - again you can just reach:
I actually made a second cut at 45 degrees across the top as well. The result of all of this was that it would, just, squeak out under the boot:
 Note the cable ties holding the driveshafts out of the way. It looks rather small when it's out, seems very large when you're trying to lift it around under the car though!
So that was a bit of a battle, but much less of a faff than removing the rear tub I reckon. If it weren't for my built in boot, it would have come out without much trouble at all. Worth considering if you're planning to make your own boot.
Here's where things went a bit wrong. I took out the new diff, and obviously needed to chop the same amount from the mounting lug. "I wonder how much is safe to take off" I thought. "Well, it looks solid so I probably don't need to worry too much".
Ooops.
Well, in case anyone's wondering how much is too much, it's just a bit less than this:
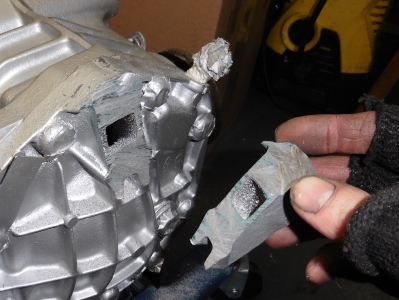
That "solid" lug has a cavity moulded into it as it turns out. Now fortunately, being as I had two diffs, I could just switch the rear covers over so it didn't slow me down too much. It did mean that I'd filled the new one with bits of aluminium filing which took ages to clean out. At some point I'll need to buy a new cover for the old one though. Me=Idiot.
Putting the new diff back in took a few evenings, but with nothing major to report. The hardest bit was lifting it back into place - couldn't really do it with the scissor lift as it needed to go up at a fair angle, so I lifted it manually from underneath. As a safety precaution I had the ever-helpful missus standing in the car with a rope around the diff, so that when my arms gave out, I didn't drop it on my face. Because that would hurt. It took about three attempts but we got it there. Then, "refitting was the reverse of removal" as they say.
One final, not to be forgotten job, is to recallibrate the speedo. This is quite simple on the Acewell, it just has a constant which relates to the wheel size and drive ratio. Multiplying by old ratio/new ratio (so, new constant=old constant * 3.62 / 3.14) should, I think, give the correct new figure - again it should be obvious when I give it a proper drive.
A quick run up and down the road has shown that it works, at least, but I'll have to wait a couple of months before I insure and tax the car again to give it a proper shakedown. It sounds a bit less noisy and a bit less clunky, which would be right since it's suppposedly been recently rebuilt.
Fuel Gauge
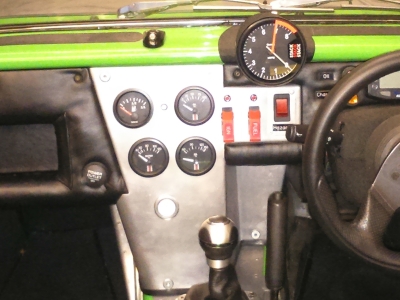
My lovely, expensive programmable Stack fuel gauge doesn't seem to play nicely with the VDO dip tube sensor. At first it went backwards, then I recallibrated it, and now it wanders aimlessly across the whole gauge every now and then before settling "somewhere". I've had zero faith in it which isn't a lot of good. It may be that it needs callibrating again, but this is a bit of a pain since you need to drain the fuel, then refill. But if it were just callibrated wrongly, I'd expect it maybe be a bit "off", but not to wander around.I've bench tested it with a potentiometer and it seemed ok; I was wondering if it needed a voltage stabiliser or something like that. But all of the other gauges are fine. Frankly I can't be arsed debugging it, so I thought I'd try a VDO gauge to match the VDO sensor. If that doesn't work then I know there's a more fundamental problem.
Since the dash was out anyway, changing the gauge was easy enough. I'd also had a loose connection behind there, the one for the gauge lights. I'd used a chock block connector for these, to take the single power feed and distribute to the 4 gauges, same for the earth and main power feeds, and one of the connections was loose. Since it's such a pain to get to, I sacked it off and soldered it all together instead.
The new gauge looks ok, though it's a shame that the needle is a different colour to all the others. The main difference is when you switch on the lights - the Stack gauges have nice white led lighting, the vdo has a dim bulb in there somewhere and doesn't look nearly as good. Still, if it tells me how much fuel I have left then I don't care.
Rear view mirror
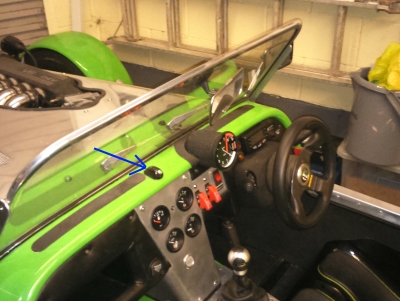
I'd never intended to keep the mirror mounted on the scuttle, and it does vibrate something terrible. I replaced it with the commonly available stick on one which I think is originally from a mini or something like that. A much better position and hopefully shouldn't shake so much.
I'd ended up glueing the scuttle one to its mount, because it was badly-made and kept falling off. This meant I couldn't easily get it off, but I'd had a cunning plan some time ago. I cut the mirror stalk off with the dremel, leaving just the base, and drilled and tapped an M6 hole in it. This gives me a handy dashboard mount to which I can screw a phone holder, for when I need a sat-nav. (arrowed below)
Lights
The LH sidelight had gone, annoyingly, so I had to replace that. I thought LEDs were supposed to last. Easy enough, though not as easy as just replacing a bulb would be. Hopefully just a duff one.
The side repeater on the same side was also nearly dead. With the cover off it was obvious why; water had got in and rusted everythign to hell, only 3 of the LEDs were still working:
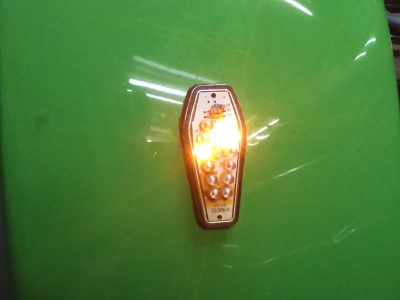
This is really annoying. I would happily buy some expensive lights to go there, but all I can find is cheap stuff, which turns out to be, well, cheap. I think the water must have got in through the cover, as the hole through the cycle wing is well filled with sealant.
Changing these sucks; there has to be a soldered connection inside the cycle wing, and obviously I covered everything with loads of sealant to keep it safe from spray, so there was lots of scraping and peeling to actually get at anything. I hope that the new one doesn't go; obviously it's a bad idea having connections and wires there, but there really isn't anywhere else to put them. We shall see.
New Boot Lid
Finally, I needed to replace my temporary "IVA special" boot lid with something more proper. I bought a sheet of 4mm ABS plastic with a "carbon" print, which is commonly used.
This turns out to be rather floppy. Rather too floppy really, certainly no good as it is without some stiffening. I used some 3/4" aluminium "U" channel, bonded to the underside with tigerseal (PU adhesive like wurth). This improves things greatly, but at an equal cost to the price of the sheet itself! I'm not sure what would be better really, a fiberglass lid would probably be best as stiffening ribs could be built in. It's such a wide lid on the Rush that it's going to be hard making something suitably rigid without it being very heavy. Plywood might actually be as good as anything else, much as I hate using wood in cars.
The lid is in two parts; a fixed part which goes around the seat belts and gives something to bolt the hinges to; and the lid itself. The hinges are marine grade stainless steel with covers from a marine supplier; I originally bought classic mini ones which are sold for this purpose, but they are designed for a curved surface and I couldn't see how they could work on a flat lid without some bodgery. The lock is a caravan door lock which I liked as it had a flip up lid. Horsebox and caravan fittings seem to be good for this sort of stuff, the things sold by the usual kit car suppliers are a bit more basic.
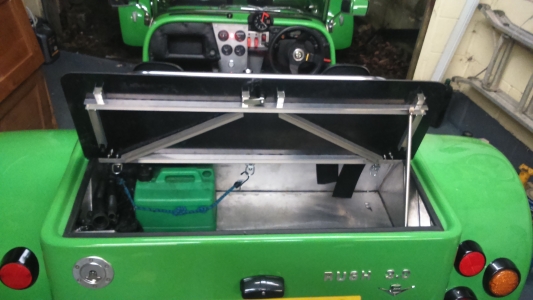

The stay keeping it open is actually something I made to hold the bonnet open in case of wind, but as luck would have it, it also fits the boot perfectly which is nice.
So that was everything on my list, I cleaned and polished the car and tucked it up for a couple of months until the weather improves (-4 today so I'm not really likely to be taking it out at the moment!). In the meantime I've got the lathe to finish, some DIY to do, and then I have Project 3 to start...rebuilding the MGB.
31 March 2015
Very brief update. In between the snow showers was a weekend of great weather. Still cold mind, but dry and sunny. So I had the car out for a good few hours on a couple of occasions. Happy to say that the new diff is great, the gear ratios are now far more normal. 6th is now for cruising at 70 and above, overtaking normally in 3rd rather than 4th. Stoneleigh in only a month, I want to get a few long runs under my belt so I'm confident that it's up to 3 hours on the M6 at rush hour.