Gearbox Rebuild
November 2014
The gearbox is rather simpler than the apron in terms of the number of parts - 2 shafts and a coupple of shifter leavers. However it proved to be much harder to actually put back together.
Before starting, as before I'd cleaned up all the gear teeth, make sure that all of the shafts were free of nicks and burrs, etc.
The clutch shaft goes in first. Each gear is a press-fit onto the shaft, and they have to be pressed in inside of the gearbox casing. I did this by tapping the shaft down onto the gears using a drift:
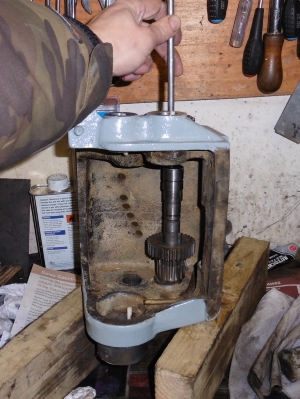

So far, so good. Gears are all on; however the shaft isn't fully seated and needs to be pushed further through the set of gears. This is difficult because of the sliding dog clutch - there's a gap required in the set of gears so you can't just carry on driving the shaft through. Some spacers are required to do this, I tried a variety of bits of old scrap and eventually found some bits of box section that did the job. Not pretty but it worked.
Short to write, took a long time to do though! Very awkward.
There's also another tricky felt which has to be pulled through the dog gear after it's all in place - the "bit of wire" trick worked here again:

There's a bit more wear in the hole for one side of the shaft than I'd like, but it seemed to tighten up once the whole thing was together. Again, not drastic enough to justify booring the hole out and fitting a bushing I didn't think. All of the rest of the bearing holes seemed in good shape though.
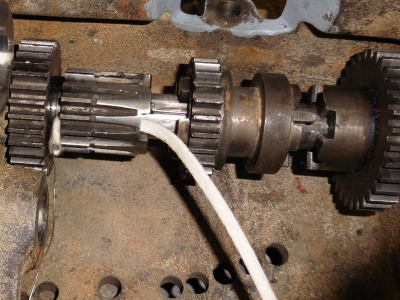
Once that shaft is in, it's time for the "christmas tree" - the shaft with the set of diminishing-sized gears. Again this is a case of tapping the gears onto the shaft inside of the casing. It's simpler in concept than the clutch shaft, as all of the gears fit in the same way, but harder to do. This is because the end two gears are in mesh with those on the clutch shaft, and for the last 3, you're dealing with a very tiny amount of clearance to actually get them onto the shaft. They are all keyed so you need to line them up with a key you can't see, while holding the very slim locknut on the end in a confined space.
This actually took me several attempts and I had to take it all apart and redo it a few times. First tip - mark the outside of the gears with paint to show you where the keyway is, so you can line them all up. Second - make sure the locknut actually screws on before fitting the shaft - mine didn't as the thread was a bit borked and I had to tidy it up with a file. Third - find a bit of tube which fits through the hole in the casing and over the shaft to use as an anvil when tapping the shaft in. Fourth - be very careful of the gears clashing with those on the clutch shaft. It would be easy to damage them when tapping the shaft in as they can get all tangled up. The rebuild book does describe this as a particularly frustrating part and it's not wrong! Not many pictures as I was too busy swearing at the thing to take any :)

The pic above shows the final stages - note the red paint on the gears to show where the keyway is; the tube used to brace the right hand side of the gears and let the shaft slide inside; and the arrow indicating the direction where a drift is used to tap the shaft into the gears. It all looks so easy here!
The main shifter really is easy, nothing complicated here at all:

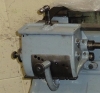
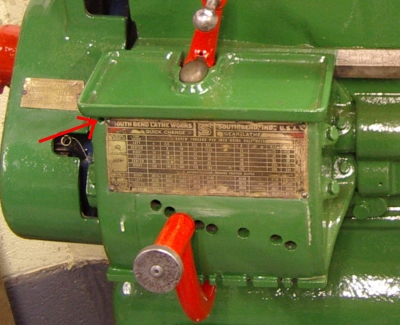
One thing I didn't know about was the oiler for this. There's a hole in the front of the gearbox, just above the brass plate in the top right hand corner. It's a bit hidden under the tray on top of the 'box - here's a picture from the lathe in its old coat of paint:
I don't recall ever noticing this hole. It leads to a copper tube which feeds oil to the shifter when it is moved right across to the far left. The oil then drips down onto the shifter, into a ground out grove and down a hole onto the shifter gear. I made sure to adjust the tube so that it was dripping onto the shifter correctly.

So that's something good to know. Move shifter left, squirt oil in, leave for a couple of minutes, then use. For the rest of the gears, I guess they must rely on splash to oil them as there's no other way to oil them directly. I suppose as long as the shifter is oiled regularly, it will eventually transfer onto the rest.
The top shifter for the dog clutch fits simply - I didn't get a picture of that, but it's just a single bolt, no trouble at all. Then it's on to actually fitting the gearbox to the lathe. I did try doing the leadscrew first, then putting the box in. I thought it would be easier than having the leadscrew in the box which makes it all quite unweildy. It almost works, but doesn't quite, so don't bother trying! It's actually not too bad anyway, I'm just a bit short of space on the left side of the lathe due to the shape of my garage. But it was ok. I noticed that running the carriage along, you can hear the apron worm gear just catching the threads of the leadscrew. I thought at first that my new leadscrew key must be too big, but I took it all out and it was just the same. Then I worried about alignment etc, was the gearbox or saddle not lined up properly, were the gib straps on the saddle too loose causing it to droop too low at the front, etc etc. I spent a good while testing all of these things, but finally concluded that it probably had always did this and I was worrying about nothing. I think it's just that there is a very tight clearance between the leadscrew and the inside of the worm gear in the apron. Everything moves freely anyway.

One slight arse was that all of the faffing with turning the gearbox over on the bench to fit the gears in had scuffed the paint up rather badly. So I needed to touch it up once it was fitted. Not a big problem for me, might be very annoying if you'd spent a lot of time filling and sanding and getting that perfect smooth finish though. I'm not sure how you'd avoid it as it's a heavy lump and does need to be layed on the painted sides during build-up, something to be aware of.
I haven't fitted the brass plate yet as I've not got around to redoing it...it's on my to-do list...