Apron Teardown
October 2014
So, on to the Apron and Saddle. As I've been delving further and further into the gubbins, and reading more and more of other rebuilds on the internet, I'm forming a better idea of the age of the thing. It seems to fall into the early stage of the "modern" lathes, with electric motors slung under the headstock, rather than the previous ones which were designed to run from overhead belting or with a motor bolted on the back somewhere. This series of lathes seems to have gone on with the same basic design until the early 80s, with the differences being largely internal. But this one seems to be right at the very start of that series; a number of internal features mentioned in the rebuild book are different, as they improved things over the years. So with everything I've seen, the old style headstock bearings, old catalogue pictures and adverts, and this Early 10K Rebuild Thread, I'm currently thinking that it is a very early 1940s model, around the 40/41 time.
First step is to remove the compound and crossslide, that's all very easy. Having read up a bit more since I first took these bits apart, I think that part of the reason there's a lot of backlash in the cross slide is that something's missing. I believe that there should be a thrust bearing at the end of the bushing, which mine doesn't have. As a result, there is a lot of play at the ends of the bushing, which manifests itself as backlash:
It's all held in place by a set screw through the dial and into a corresponding screw in the shaft. Looking at the shaft, it's clear that someone has redrilled this further in at some point (not very well obviously), presumably after losing the thrust bearing and trying to take up the slack.
There is also noticable play in the screw and nut itself; the compound screw is the same. so I'm currently looking into getting new ones made as there is a chap in the US who machines new ones. That, and sorting out a new thrust bearing, should give a noticable improvement to how it feels in use. Below are a couple of pics with measurements, just in case it's useful to anyone.
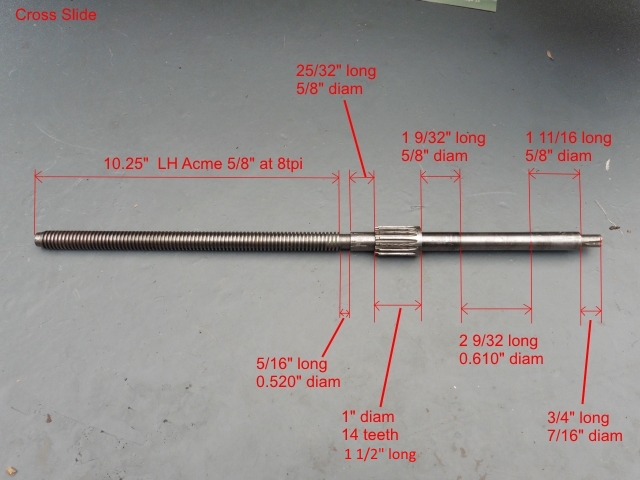
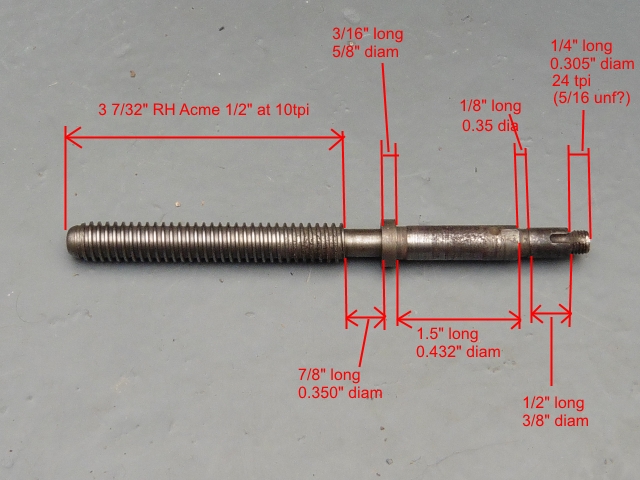 Left: Cross Slide Screw. Right: Compound Screw
I was pleased to see that my repair to the cross slide bushing had held up. There is a bit more play in it than I'd like though, and I've never been convinced that the bore is totally straight as it seems to get stiffer at various points. So I may make a new one as a bit of a turning project. The compound one is in a much worse state, very worn, so I will definately look at replacing that one. They'll both work well enough for me to get it back together so that I can use the lathe to repair itself though!
First job is to remove the 4 cheese-head screws which hold the apron off and lower it away. These are the ones I originally sourced the drag-link socket for, and it worked very well. As I was working on me todd, I wrapped some rope around the apron as it's rather heavy and I didn't fancy unscrewing it with one hand and trying to catch it with the other!

That worked well and it all came off easily enough. And looked exceptionally gungy.

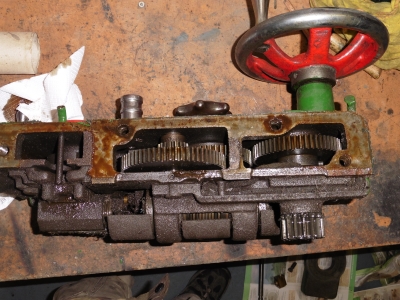
 Dennis! There's some lovely filth over 'ere!
Again, I won't describe every step as it's quite long and involved, and the book does a very good job of it. It's quite detailed work but almost everything came apart easily. And it was indeed very gungy, the pictures don't really show the sheer quantity of oily cack which came out.
There were however a few things which did not come apart easily. The first were the dowel pins which hold the collars on the side of the worm gear. These are just plain pins, not tapers; however being soft, they had splayed at the top, and the only way to get them out is to carry on knocking them through, basically forcing the pin through a hole which it is now too big for. I actually broke 2 punches on these buggers, drilling them out might have been a better option in hindsight.
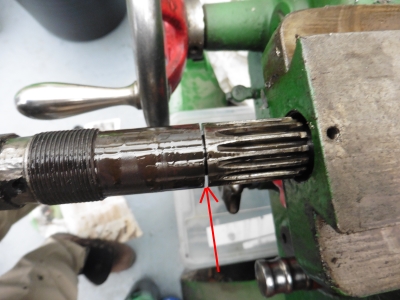
The inside of the worm gear has a key which engages in the slot on the leadscrew, and it's this that gives the drive to move the carriage or compound (unless screwcutting, in which case you use the half-nuts which engage on the actual thread of the leadscrew). The idea is to save the leadscrew threads from wear when the carriage movement is not critical.
Well, it certainly wears the key! I think I'll put that down as a definite "item to replace":
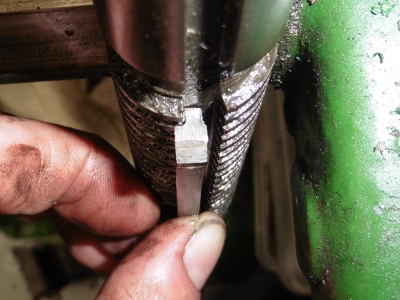
No wear at all on the keyway inside the worm though, which is good, it's all on the key itself which is obviously much easier to replace.
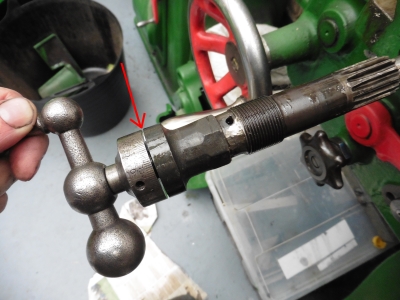
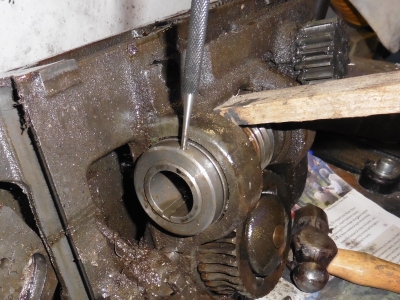
Another troublesome part was the clutch. I spent ages, having followed every step in the book, trying to work out why the clutch assembly wouldn't come out. In the end it turned out to be the oil distribution washer - like a large flat toothed disc. This just "hangs" on the shaft and when you try to pull it out, it blocks the hole.


Kinda hard to see - that was part of the problem. On the left, the washer is hanging down and blocking the hole - I'm trying to pull the large star-shaped nut, and the gear behind it, out towards the camera. On the right, I've lifted the washer with a screwdriver. Dead easy to wiggle it out once you know it's there, a great deal of time spent peering into the filth with a bemused expression when you don't.
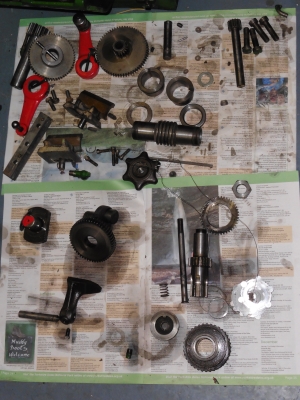
The clutch consists of a series of metal discs - as per the book I made sure to thread these onto a length of wire as I took them off, so that I can keep them all in the same orientation and order.
Quite a lot of parts in total, but it's not too technical. Cleverly designed, mind. Apart from the worm key, there doesn't seem to be any particularly worn parts - I'm sure the various gears have a bit more slack in them than when they were new, but nothing to worry about. All of the shafts seem in fine condition. I was worried what state the half nuts would be in having seen the wear on the leadscrew. But while they obviously are somewhat worn, experimenting with holding them around the non-worn part of the leadscrew gave no noticable slack. Compared to the worn part of the screw, where there's a great deal. So hopefully there's some more life in them yet, assuming a new screw.