What Next?
13 July 2009
Not a lot of physical progress to report, largely because I've been on holiday. However, with the engine in, I've also spent a lot of time staring, trying different things, scratching my head, and generally mulling on how to proceed.
I'm basically trying to sort out and measure everything I need to while the engine is in, then remove it, and hopefully not have to put it back in until it's rebuilt and ready. (like that'll happen). So I've been looking at a number of things:
Supercharger - will it fit?
It clearly wouldn't with the large driveshaft extension, so I had to take that off. This required an evening's work, but wasn't too complicated apart from being b****y tight. With the shaft removed, the 'charger is...still huge (about 9" in diameter). However, it looks like it should fit in front of the engine. The problem won't be the supercharger itself, but where to put the air inlet and intercooler. I was hoping that I could use a NACA duct or similar in the top of the nosecone to get air in, however there's bits of chassis (and the top of the radiator, which slopes backwards) in the way there; so it looks like a fitment low down will be necessary, with the inlet probably sticking out of the side somewhere.
This does mean that an intercooler can go in the same position as the cossie boys have it, above the radiator, and there's plenty of room for ducting the air from the compressor, through the intercooler, and along the side of the engine to the back where the inlet is. (Things should be a bit clearer when I've sorted out the thermostat housing which is currently sticking further than is normal out the front of the engine - this because the inlet pipe, which runs between the heads to the back of the engine, had to be moved to do the gearbox conversion, and I need to take the heads off to remove it before I can modify it before I can see exactly how much room I have....)
Verdict - Jury still out, but hopeful
Handbrake
Current thinking is that I will move this onto the side of the transmission tunnel, but arranged almost vertically (like in a WRC car). That will put it just in front and to the right of the gear lever, with a roughly straight-back pull to put it on. A mock up with cable ties and random odd bits of bracketry looks basically promising, though I will need to make a cutout in the transmission tunnel and rework it in ally, and modify the handbrake itself a little. What I need to do here is to fit a seat so I can see exactly where it needs to go, then make up a bracket and weld it to the chassis.
Verdict - Need a seat first!
Footwell Inner Panels
I've decided to do these entirely out of ally, as the GRP ones simply are not going to fit without a lot of gap filling, which I think will end up looking messy. I of course need to buy some ally sheet, but even then I need to fit the handbrake first (assuming it all works out as planned). On the passenger side, I need to fit the clutch arm before I can see exactly how much room there is.
Verdict - Need to do handbrake and clutch first
Rear Brake Line
The supposed next step in the build, but I need to put the driver's footwell panel in place first and run the line along the outside of it. If I'm going to move the handbrake to the transmission tunnel, I need to do that first so as I'm not welding and grinding around a newly-fitted brake line.
Verdict - Need to do footwell panel first
Rear Bulkhead
Can't do this until I get the new corner panels from Dax.
Verdict - Waiting
Side Panels
Still thinking about these. Some people rivet them to every crossmember, others go to great lengths to hide all of the rivets and make up panels with folded edges etc by hand, which looks good but will they rattle or flex too much?
Verdict - Still thinking
The outcome of all of this is, I need to buy a seat before I can do the handbrake before I can do the footwell panel before I can put the brake line in. So that's the next move.
In the meantime...
Fortunately, there are still plenty of things to be doing. So I've done odd jobs like trim the scuttle so that it sits in place (more trimming required later). Then I moved on to the pedal box area, where there is, shall we say, a bit of a conflict:
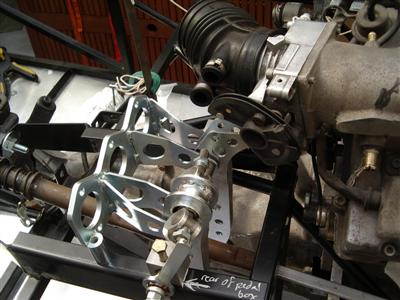

As the image on the left shows, the tops of the pedals are right where the throttle lever wants to be. There is just clearance as shown here, but unfortunately, the throttle cable mounting bracket wants to be inside the pedal box (right hand image, arrowed). And that's just not gonna work. Some thought required...
15 July 2009
After a bit of looking around, I've settled on some seats from JK Composites. They are light, look great, everyone says they are comfortable (despite not looking it!), and a good price. I've spoken to the guys and they are sending me some trim samples, so I should be able to finalise my order this week.